

By Michael Smith — Owner, Smith’s Surplus & Supply. Michael personally inspects and condition-grades every item using our 4 Point Inspection standard, verifies gear against National Stock Numbers (NSNs) to confirm authenticity, and has personally handled over 7,000 orders and inspected more than 13,000 items — including the FILBE hydration systems covered in this guide.
Gear in this guide:
- CamelBak 100oz Mil-Spec Antidote 90854 Short Reservoir — the FILBE Bladder
- USMC FILBE Hydration Carrier — FILBE Hydration Carrier
Quick summary: Most hydration bladder problems — mold, funky taste, a bite valve that never quite feels clean — come down to two things: sugar residue from anything besides water, and gear getting packed away while still damp. This guide covers the daily habit that prevents most of it, the full deep-clean process (with ratios that are actually safe, not the inflated bleach recipes floating around the internet), how to strip out Gatorade and electrolyte mix residue specifically, and a few field-tested tricks that cut the job in half.
“Hydrate or die” was never supposed to mean dying from what’s growing inside your own bladder. If you’re running one hard — rucking, range days, hunting camp, whatever — it’s easy to let cleaning slide until the water starts tasting like the inside of a gym bag. The good news: a CamelBak bladder is simple to keep in field-ready shape once you know what actually matters. The bad news: a lot of the “cleaning hacks” floating around outdoor forums use ratios that are either too weak to do anything or strong enough to leave a chemical taste — or worse — in your water. Here’s what actually holds up.
The One Habit That Prevents Most of the Problem
Rinse it every time you use it — even if it only had water in it. Dump whatever’s left, run hot water through the bladder and the tube for about 15–20 seconds with the bite valve held open, and let it drain. That’s it. Bacteria and mold need standing moisture and time to establish themselves; a same-day rinse denies them both.
If you only ever fill it with plain water, that quick rinse plus a full wash every few uses is enough. Where guys get in trouble is the next part.
If You Ran Anything Besides Water Through It
This is what actually causes most bladder problems, and it earns its own section — the standard rinse-and-wash routine isn’t enough by itself once sports drinks or electrolyte mixes are in the picture.
Sports drink mixes and electrolyte powders leave a sugary film that starts feeding bacteria almost immediately, and that film gets significantly harder to remove once it dries onto the interior walls, the tube, or the bite valve seat. The rule that actually matters: if it had anything but water in it, wash it that same day — not “when I get around to it.”
A few specifics that make a real difference here:
- Give the tube and bite valve extra attention. Sugary residue collects disproportionately in those two spots since they’re narrower and slower to rinse clean. A dedicated tube brush earns its keep specifically for this reason.
- Rehydrate before you scrub. If residue has already dried into the corners or seams, don’t go straight at it with a brush — fill the bladder with warm water first and let it sit a few minutes. That softens dried sugar so it wipes away instead of needing to be scraped, and it’s genuinely faster than fighting dried residue directly.
- Know the long-term tradeoff. The salt and sugar in sports drinks are mildly abrasive to the bladder and bite valve material over repeated use, and the flavor can work its way into the plastic lining over time — meaning plain water poured in afterward can pick up a faint off-flavor that doesn’t fully rinse out. This is why a lot of guys running mixed loadouts keep one bladder dedicated to water and a separate one for electrolyte mixes, rather than fighting the residue every single time. If that’s the move, the CamelBak 100oz Mil-Spec Antidote 90854 Short Reservoir is a solid, inexpensive way to run a second one — a genuine, previously-issued FILBE bladder (NSN 8465-01-600-7956), visually inspected for functionality, with the wide-mouth opening that makes this whole cleaning process noticeably easier in the first place.
The Full Deep-Clean, Step by Step
Run this every couple of weeks if you’re using the bladder regularly, immediately after any trip where you ran something besides water, or any time you notice mold, a stale taste, or an off smell.
- Disassemble and rinse. Pull apart the bladder, tube, and bite valve. Give everything a quick warm-water rinse before you start.
- Soften stuck connections if needed. If the tube or bite valve won’t separate easily, soak that connection point in hot (not boiling) water for 5–10 minutes first — it softens the plastic just enough to pull apart without forcing it or tearing anything. Same trick works in reverse when you’re reassembling.
- Wash with warm water and mild dish soap. Fill the bladder about halfway, seal it, and shake for 10–15 seconds. Pinch the bite valve open so the soapy water flushes through the hose too.
- Deep clean if there’s mold, odor, or lingering taste. Pick one method — don’t combine them:
- Cleaning tablets: Drop one into warm water in the bladder and follow the package’s soak time (this varies by brand, so check the label rather than guessing).
- Baking soda: ¼ cup per liter of bladder volume, mixed into warm water. Shake for 30 seconds, then let it sit 20–30 minutes.
- White vinegar: 1 part vinegar to 4 parts warm water. Soak 20 minutes, then rinse until the vinegar smell is gone.
- Bleach (for genuine mold/disinfection): 2–5 drops of unscented household bleach per liter of water — that’s it, not tablespoons. Swirl for 10 seconds, flush a bit through the tube and bite valve, then leave it filled overnight. This is the ratio hydration-bladder manufacturers actually publish; recipes calling for a full tablespoon or more per liter are far stronger than necessary and more likely to leave a chemical taste behind.
- Never mix bleach with vinegar or other cleaners in the same soak. The combination produces toxic chlorine gas. Pick one method per cleaning session.
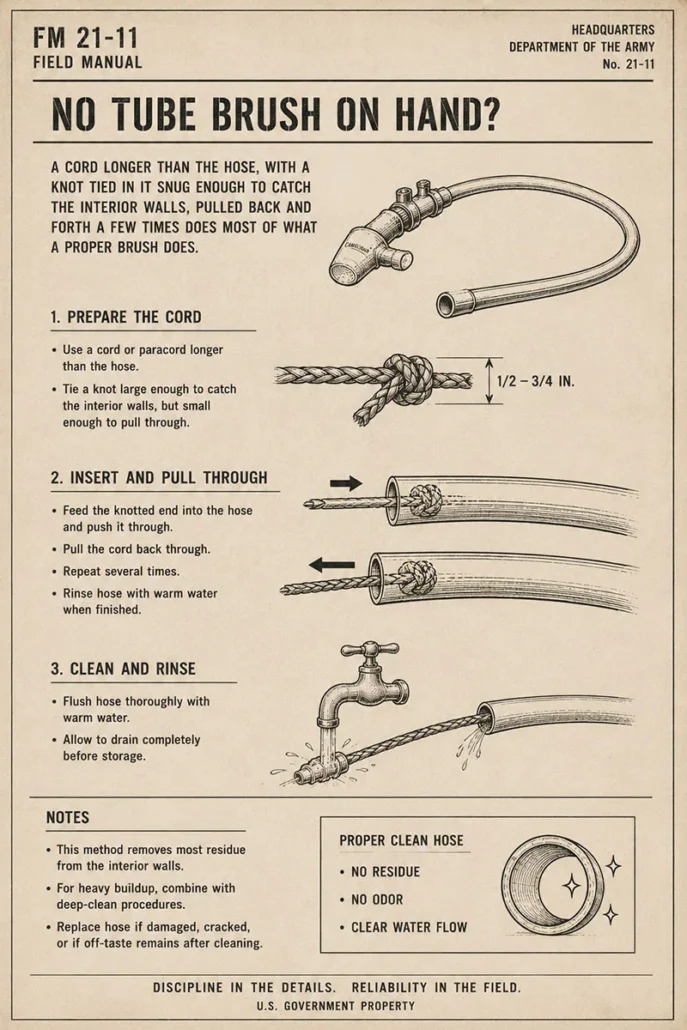
- Scrub the details. A soft brush on the interior walls and seams, a narrow tube brush (or a knotted cord pulled through the hose a few times) for the tube, and the bite valve scrubbed separately since it’s where residue and bacteria hide hardest.
- Rinse thoroughly. Refill with plain warm water and shake-and-drain 2–3 times, until there’s no soap, bleach, or vinegar smell left at all. This step matters as much as the cleaning itself — anything left behind just gets rinsed straight into your next fill.
- Dry completely before storing (see below). A bladder packed away even slightly damp restarts the whole mold cycle.
Worth knowing: CamelBak lists the bite valve and straw on their bottles as top-rack dishwasher safe. That doesn’t extend to the bladder itself — hand-wash it.
Tricks That Cut the Job in Half
- Prop it open while it dries. Kitchen tongs, a balled-up paper towel, or even a whisk works as well as a dedicated bladder dryer — anything that holds the sides apart so air can actually reach the interior.
- No tube brush on hand? A cord longer than the hose, with a knot tied in it snug enough to catch the interior walls, pulled back and forth a few times does most of what a proper brush does.
- Freeze it between uses if you can’t dry it all the way. Fold the rinsed, empty bladder and stash it in the freezer. Cold halts mold and bacteria growth outright — this is a legitimate manufacturer-recommended shortcut, not just a forum trick, and it’s especially useful if you’re running electrolyte mixes regularly and don’t want to do a full deep-clean every single time.
- Build the habit that skips the deep-clean most weeks: a 2-minute hot water flush right after use, before residue has a chance to dry, means you’ll rarely need the full soak-and-scrub process at all.
Drying: The Step Nobody Does Right
Trapped moisture is the actual root cause behind almost every moldy bladder — more so than anything about the cleaning solution itself. Hang the bladder and tube upside down, propped open, somewhere non-humid (skip the bathroom). Let it sit until it’s genuinely bone-dry inside, not just dry to the touch on the outside.
If you’re running a FILBE bladder inside an insulated carrier — the USMC FILBE Hydration Carrier or similar mil-spec sleeves — keep in mind the foam insulation that keeps your water temperature stable also holds onto ambient moisture more than an open-air pack pocket does. Make sure the bladder is fully dry before it goes back in the carrier, not just before it goes back in your ruck.
When Cleaning Won’t Save It
Some things are worth replacing instead of fighting. Permanent mold staining, a bite valve that’s gone soft or won’t seal, or a bladder that’s picked up a flavor it won’t rinse out are all signs it’s time for a new one rather than another deep clean. If you’re rebuilding a FILBE setup or replacing lost CIF gear, the CamelBak 100oz Mil-Spec Antidote 90854 Short Reservoir is a genuine, NSN-traceable (8465-01-600-7956) FILBE bladder built to the short profile the carrier is designed around — not a knockoff shaped to fit loosely. We grade our surplus honestly: this one’s listed Very Good, meaning previously issued with some expected cosmetic wear, visually inspected for functionality — not new-in-wrapper, and we won’t pretend otherwise.
Shop the gear in this guide:
- CamelBak 100oz Mil-Spec Antidote 90854 Short Reservoir — the FILBE bladder — $26.59
- USMC FILBE Hydration Carrier — from $34.30
Questions about fit or condition grading before you order? Call or text (845) 218-0943.